
EKS에서 Service를 생성할 때마다 외부 트래픽을 받기 위해 ALB나 NLB를 생성해야 합니다. 이것은 매우 귀찮은 일이고, AWS WAF 같은 리소스가 추가로 붙으면 더 까다로워질 것입니다.
이것을 해결하기 위해 AWS Load Balancer Controller가 나왔습니다. AWS Load Balancer Controller는 EKS 클러스터의 Elastic Load Balancer 관리를 돕는 Controller입니다. Ingress를 통하여 ALB, Service를 통하여 NLB를 생성할 수 있습니다. 쿠버네티스 리소스를 이용해 ELB를 생성하므로 yaml 파일로 생성과 제거가 가능하여 관리또한 쉬워집니다.

오늘은 AWS Load Balancer Controller를 설치하고, ALB와 NLB를 생성해봅시다.
1. 설치
자주 쓰이는 변수는 미리 등록해 두겠습니다.
CLUSTER_NAME=$(eksctl get clusters -o json | jq -r '.[0].Name')
AWS_DEFAULT_REGION="ap-northeast-2"
AWS_ACCOUNT_ID=$(aws sts get-caller-identity --query Account --output text)IAM Role에 적용할 Policy를 생성합니다.
curl -O https://raw.githubusercontent.com/kubernetes-sigs/aws-load-balancer-controller/v2.4.7/docs/install/iam_policy.json

aws iam create-policy \
    --policy-name AWSLoadBalancerControllerIAMPolicy \
--policy-document file://iam_policy.jsonController가 AWS 리소스에 접근할 수 있도록 OIDC를 발급한 후 IAM Role과 연결된 serviceaccount를 생성합니다.
eksctl utils associate-iam-oidc-provider --cluster ${CLUSTER_NAME} --approve

eksctl create iamserviceaccount \
  --cluster=$CLUSTER_NAME \
  --namespace=kube-system \
  --name=aws-load-balancer-controller \
  --role-name AmazonEKSLoadBalancerControllerRole \
  --attach-policy-arn=arn:aws:iam::$AWS_ACCOUNT_ID:policy/AWSLoadBalancerControllerIAMPolicy \
--approveHelm을 통해 Controller를 설치합니다.
helm repo add eks https://aws.github.io/eks-charts
helm repo update eks

helm install aws-load-balancer-controller eks/aws-load-balancer-controller \
  -n kube-system \
  --set clusterName=$CLUSTER_NAME \
  --set serviceAccount.create=false \
--set serviceAccount.name=aws-load-balancer-controller간단하게 설치가 완료되었습니다.
[ec2-user@ip-10-0-11-131 ~]$ kubectl get deployment -n kube-system aws-load-balancer-controller
NAME                           READY   UP-TO-DATE   AVAILABLE   AGE
aws-load-balancer-controller 2/2 2 2 16s2-1. ALB
nginx image를 사용하는 deployment를 배포합니다.
# deployment.yaml
apiVersion: apps/v1
kind: Deployment
metadata:
  name: demo
spec:
  replicas: 2
  selector:
    matchLabels:
      app: demo
  template:
    metadata:
      labels:
        app: demo
    spec:
      nodeSelector:
        node: app
      tolerations:
      - key: node
        operator: Equal
        value: app
        effect: NoSchedule
      containers:
      - name: nginx
        image: nginx:1.14.2
        ports:
- containerPort: 80kubectl apply -f deployment.yamlPod를 외부로 공개시키기 위해 NodePort service를 배포합니다.
# service.yaml
apiVersion: v1
kind: Service
metadata:
  name: demo
spec:
  type: NodePort
  selector:
    app: demo
  ports:
    - protocol: TCP
      port: 80
targetPort: 80kubectl apply -f service.yaml이제 기초 리소스들을 다 배포했으니 Ingress를 통해 ALB를 생성해봅시다. annotation을 통해 ALB에 대한 설정을 할 수 있습니다. 다음 링크를 통해 더 많은 annotation에 대해 알아볼 수 있습니다.
https://kubernetes-sigs.github.io/aws-load-balancer-controller/v2.6/guide/ingress/annotations
Annotations - AWS Load Balancer Controller
Ingress annotations You can add annotations to kubernetes Ingress and Service objects to customize their behavior. Annotation keys and values can only be strings. Advanced format should be encoded as below: boolean: 'true' integer: '42' stringList: s1,s2,s
kubernetes-sigs.github.io
# ingress.yaml
apiVersion: networking.k8s.io/v1
kind: Ingress
metadata:
  name: demo
  annotations:
    alb.ingress.kubernetes.io/load-balancer-name: demo-alb
    alb.ingress.kubernetes.io/target-type: instance
    alb.ingress.kubernetes.io/scheme: internet-facing
    alb.ingress.kubernetes.io/subnets: demo-subnet-public1-ap-northeast-2a, demo-subnet-public2-ap-northeast-2c
spec:
  ingressClassName: alb
  rules:
    - http:
        paths:
          - path: /
            pathType: Prefix
            backend:
              service:
                name: demo
                port:
number: 80load-balancer-name을 통해 생성될 ALB의 이름을 지정해줄 수 있습니다.
alb.ingress.kubernetes.io/load-balancer-name: demo-albtarget-type을 통해 target group의 target 속성을 지정할 수 있습니다. 보통 EC2 Node Group을 사용하면 instance로 지정하고, Fargate를 사용하면 ip로 지정합니다.
alb.ingress.kubernetes.io/target-type: instancescheme을 통해 ALB의 범위를 지정합니다. ALB를 인터넷을 통해 공개할 것이라면 internet-facing, VPC 내부에서만 동작하게 하려면 internal로 지정합니다.
alb.ingress.kubernetes.io/scheme: internet-facingsubnets를 통해 ALB가 위치할 Subnet의 이름을 지정합니다. scheme이 internet-facing이라면 public subnet, internal이라면 private subnet을 지정합니다. ',' 를 통해 Subnet을 구분합니다.
alb.ingress.kubernetes.io/subnets: demo-subnet-public1-ap-northeast-2a, demo-subnet-public2-ap-northeast-2c생성 후 ingress 리스트를 보았을 때 ADDRESS가 나오면 성공입니다.
kubectl apply -f ingress.yaml[ec2-user@ip-10-0-11-131 ~]$ kubectl get ingress
NAME CLASS HOSTS ADDRESS PORTS AGE
demo alb * demo-alb-1507978470.ap-northeast-2.elb.amazonaws.com 80 35s해당 ADDRESS로 접속하면 nginx 화면이 나오게 됩니다.

Target Group을 보면 모든 Node들이 NodePort가 사용하는 포트를 통해 등록된 것을 볼 수 있습니다.

2-2. NLB
리소스들을 정리하고 deployment만 남겨둡니다. ingress를 삭제하면 ALB도 같이 삭제됩니다.
kubectl delete -f ingress.yaml
kubectl delete -f service.yamlService를 통해 NLB를 생성합니다. NodePort가 아닌 LoadBalancer type을 사용합니다. 마찬가지로 annotation을 통해 NLB 설정을 할 수 있고, 다음 링크를 통해 더 많은 annotation에 대해 알아볼 수 있습니다.
https://kubernetes-sigs.github.io/aws-load-balancer-controller/v2.6/guide/service/annotations/
Annotations - AWS Load Balancer Controller
Annotations Service annotations Annotation keys and values can only be strings. All other types below must be string-encoded, for example: boolean: "true" integer: "42" stringList: "s1,s2,s3" stringMap: "k1=v1,k2=v2" json: "{ \"key\": \"value\" }" Annotati
kubernetes-sigs.github.io
# service.yaml
apiVersion: v1
kind: Service
metadata:
  name: demo
  annotations:
    service.beta.kubernetes.io/aws-load-balancer-name: demo-nlb
    service.beta.kubernetes.io/aws-load-balancer-nlb-target-type: instance
    service.beta.kubernetes.io/aws-load-balancer-subnets: demo-subnet-public1-ap-northeast-2a, demo-subnet-public2-ap-northeast-2c
    service.beta.kubernetes.io/aws-load-balancer-scheme: internet-facing
spec:
  type: LoadBalancer
  loadBalancerClass: service.k8s.aws/nlb
  selector:
    app: demo
  ports:
    - protocol: TCP
      port: 80
targetPort: 80설정 값은 Ingress와 비슷한 맥락이기 때문에 넘어가겠습니다.
kubectl apply -f service.yaml생성 후 Service 리스트를 보았을 때 EXTERNAL-IP가 나오면 성공입니다.
[ec2-user@ip-10-0-11-131 ~]$ kubectl get service
NAME         TYPE           CLUSTER-IP    EXTERNAL-IP                                                  PORT(S)        AGE
demo         LoadBalancer   172.20.5.33   demo-nlb-d3448cffbffc63f4.elb.ap-northeast-2.amazonaws.com   80:32326/TCP   16s
kubernetes ClusterIP 172.20.0.1 <none> 443/TCP 27hEXTERNAL-IP로 접속하면 nginx 화면이 나오게 됩니다.

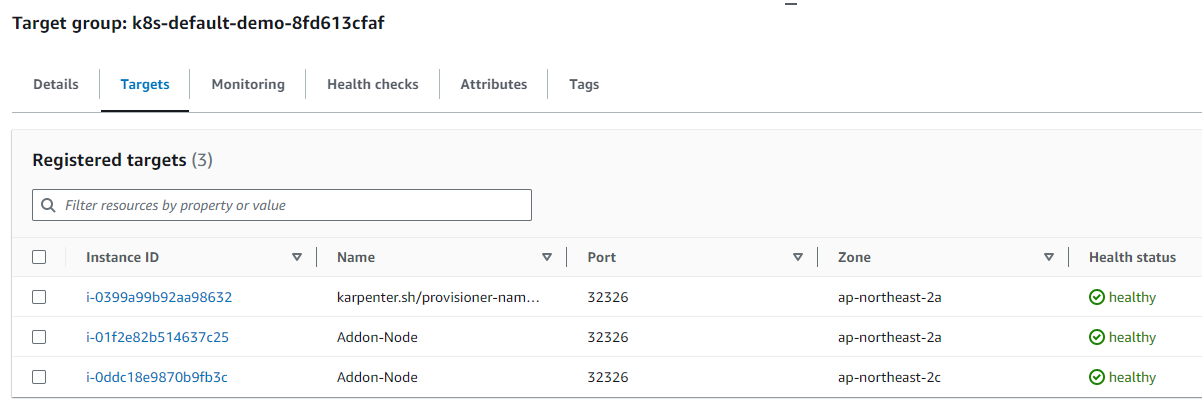
Target Group을 보면 모든 Node들이 LoadBalancer가 사용하는 포트를 통해 등록된 것을 볼 수 있습니다.
오늘의 글은 여기까지입니다. 감사합니다!
'AWS' 카테고리의 다른 글
| [AWS] RDS Read Replicas & Multi AZ (3) | 2023.09.30 |
|---|---|
| [AWS] RDS의 개념과 기본 실습 (0) | 2023.09.29 |
| [AWS] EKS AutoScaling - Karpenter (2) | 2023.09.25 |
| [AWS] aws-nuke로 모든 리소스 삭제 (1) | 2023.09.24 |
| [AWS] EKS Node Metadata (IMDS) - EC2 (2) | 2023.09.22 |