
쿠버네티스는 부하 증가에 대비해 HPA(Horizontal Pod Autoscaler)를 제공하고 있습니다. HPA를 사용하면 CPU나 메모리의 사용량에 따라 Pod를 추가적으로 배치하거나 감소시킬 수 있습니다.

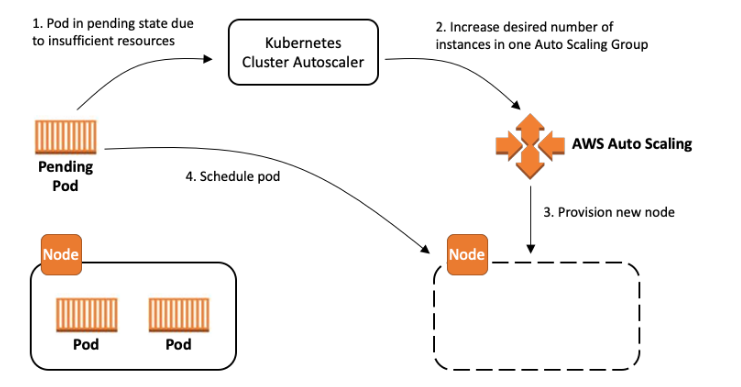
그러나 HPA로 Pod를 늘리다보면 EC2 Node 리소스가 부족해져 Pod가 Pending 상태에 놓이게 됩니다. 이때, Cluster Autoscaler를 사용하면 Node를 자동으로 증축시켜 Node 리소스 부족에 대처할 수 있습니다. 또한, 부하 감소로 활용도가 낮은 Node가 있다면 Node를 축소시키기도 합니다.
오늘은 HPA, Cluster Autoscaler를 이용하여 부하 증가에 대응해봅시다.
0. Deployment 준비
HPA의 대상이 되는 deployment를 먼저 준비하겠습니다. yaml은 다음과 같습니다.
# deployment.yaml
apiVersion: apps/v1
kind: Deployment
metadata:
  name: demo
spec:
  selector:
    matchLabels:
      app: demo
  template:
    metadata:
      labels:
        app: demo
    spec:
      nodeSelector:
        node: app
      tolerations:
      - key: node
        operator: Equal
        value: app
        effect: NoSchedule
      containers:
      - name: php-apache
        image: registry.k8s.io/hpa-example
        resources:
          requests:
            cpu: 200m
          limits:
            cpu: 500m
        ports:
- containerPort: 80이때 deployment의 replicas 설정은 반드시 제거하며, HPA의 scale-out 기준이 request 라는 것을 알아야 합니다.
또한, app 전용 node에 배치하기 위해 toleration과 nodeSelector을 이용했습니다.
또한, 부하 테스트에서 트래픽을 주입하기 위해 Service와 Ingress까지 준비하겠습니다.
# service.yaml
apiVersion: v1
kind: Service
metadata:
  name: demo
spec:
  type: NodePort
  selector:
    app: demo
  ports:
    - protocol: TCP
      port: 80
targetPort: 80# ingress.yaml
apiVersion: networking.k8s.io/v1
kind: Ingress
metadata:
name: demo
annotations:
alb.ingress.kubernetes.io/load-balancer-name: demo-alb
alb.ingress.kubernetes.io/target-type: instance
alb.ingress.kubernetes.io/subnets: demo-subnet-public1-ap-northeast-2a, demo-subnet-public2-ap-northeast-2c
alb.ingress.kubernetes.io/scheme: internet-facing
spec:
ingressClassName: alb
rules:
- http:
paths:
- path: /
pathType: Prefix
backend:
service:
name: demo
port:
number: 80이제 리소스들을 생성하고 HPA와 Cluster Autoscaler를 이용해봅시다.
kubectl apply -f deployment.yaml
kubectl apply -f service.yaml
kubectl apply -f ingress.yaml1. HPA
HPA를 이용하려면 Metrics Server가 필요합니다. metrics server는 클러스터에서 리소스 사용량 집계자의 역할을 합니다.
metrics server를 설치해보겠습니다.
kubectl apply -f https://github.com/kubernetes-sigs/metrics-server/releases/latest/download/components.yaml'kubectl top (node, pod)'로 metrics server를 이용하여 리소스 사용량 확인이 가능합니다.
[ec2-user@ip-10-0-6-75 ~]$ kubectl top nodes
NAME                                              CPU(cores)   CPU%   MEMORY(bytes)   MEMORY%
ip-10-0-131-67.ap-northeast-2.compute.internal    30m          1%     626Mi           8%
ip-10-0-133-56.ap-northeast-2.compute.internal    163m         8%     702Mi           21%
ip-10-0-146-102.ap-northeast-2.compute.internal   45m          2%     686Mi           20%
ip-10-0-155-251.ap-northeast-2.compute.internal   23m          1%     556Mi           7%
[ec2-user@ip-10-0-6-75 ~]$ kubectl top pods
NAME                    CPU(cores)   MEMORY(bytes)
demo-6f665ffbcb-8ltg9 100m 15Mi이제 HPA를 생성하겠습니다. 타겟으로 demo Deployment를 선정하고, 최소 pod 개수는 2, 최대 pod 개수는 20으로 설정하겠습니다. autoscaling 기준은 CPU이며, CPU 평균 사용률 50% 유지를 목표로 합니다. 50%가 넘어가면 Pod를 추가로 생성하고, 50% 미만이면 Pod를 서서히 감소시킬 것입니다.
# hpa.yaml
apiVersion: autoscaling/v2
kind: HorizontalPodAutoscaler
metadata:
  name: demo
spec:
  scaleTargetRef:
    apiVersion: apps/v1
    kind: Deployment
    name: demo
  minReplicas: 2
  maxReplicas: 20
  metrics:
  - type: Resource
    resource:
      name: cpu
      target:
        type: Utilization
averageUtilization: 50kubectl apply -f hpa.yaml'kubectl get hpa'를 해서 deployment의 현재 리소스 사용량을 볼 수도 있습니다.
[ec2-user@ip-10-0-6-75 ~]$ kubectl get hpa
NAME   REFERENCE         TARGETS   MINPODS   MAXPODS   REPLICAS   AGE
demo Deployment/demo 12%/50% 2 20 2 114s2. Cluster Autoscaler
Cluster Autoscaler가 AutoScaling Group을 조정할 수 있도록 serviceaccount를 생성해야 합니다.
serviceaccount가 IAM 리소스에 액세스 할 수 있도록 OIDC Provider부터 생성하겠습니다. cluster 옵션에 EKS 클러스터 이름을 지정하면 됩니다.
eksctl utils associate-iam-oidc-provider --cluster DemoCluster --approveIAM Role에 연결되는 Policy를 생성하겠습니다. 다음 json을 이용하여 policy를 생성합니다.
# AmazonEKSClusterAutoscalerPolicy
{
  "Version": "2012-10-17",
  "Statement": [
    {
      "Effect": "Allow",
      "Action": [
        "autoscaling:DescribeAutoScalingGroups",
        "autoscaling:DescribeAutoScalingInstances",
        "autoscaling:DescribeLaunchConfigurations",
        "autoscaling:DescribeScalingActivities",
        "autoscaling:DescribeTags",
        "ec2:DescribeInstanceTypes",
        "ec2:DescribeLaunchTemplateVersions"
      ],
      "Resource": ["*"]
    },
    {
      "Effect": "Allow",
      "Action": [
        "autoscaling:SetDesiredCapacity",
        "autoscaling:TerminateInstanceInAutoScalingGroup",
        "ec2:DescribeImages",
        "ec2:GetInstanceTypesFromInstanceRequirements",
        "eks:DescribeNodegroup"
      ],
      "Resource": ["*"]
    }
  ]
}IAM Role과 그와 연결되는 serviceaccount를 생성합니다. cluster 옵션은 EKS 클러스터의 이름, attach-policy-arn 옵션은 생성한 Policy의 arn을 지정해주면 됩니다.
eksctl create iamserviceaccount \
    --cluster=DemoCluster \
    --namespace=kube-system \
    --name=cluster-autoscaler \
    --attach-policy-arn=arn:aws:iam::073813292468:policy/AmazonEKSClusterAutoscalerPolicy \
    --override-existing-serviceaccounts \
--approvehelm을 통해 Cluster Autoscaler를 설치합니다. autoDiscovery.clusterName, awsRegion 옵션을 자유롭게 설정하면 됩니다. cluster autoscaler 버전(image.tag) 은 다음 링크에 나와 있습니다.
https://github.com/kubernetes/autoscaler/releases
Releases · kubernetes/autoscaler
Autoscaling components for Kubernetes. Contribute to kubernetes/autoscaler development by creating an account on GitHub.
github.com
쿠버네티스 버전과 Cluster Autoscaler 버전을 맞춰야 합니다. 예시로, 쿠버네티스 1.27.X 버전은 Cluster Autoscaler 1.27.X 버전을 사용해야 합니다.
helm repo add autoscaler https://kubernetes.github.io/autoscaler
helm repo update autoscaler

helm install cluster-autoscaler autoscaler/cluster-autoscaler \
    --namespace kube-system \
    --set autoDiscovery.clusterName=DemoCluster \
    --set awsRegion=ap-northeast-2 \
    --set cloudProvider=aws \
    --set image.tag=v1.27.3 \
    --set rbac.serviceAccount.create=false \
--set rbac.serviceAccount.name=cluster-autoscaler설치가 잘 되었습니다.
[ec2-user@ip-10-0-6-75 ~]$ kubectl --namespace=kube-system get pods -l "app.kubernetes.io/name=aws-cluster-autoscaler,app.kubernetes.io/instance=cluster-autoscaler"
NAME                                                        READY   STATUS    RESTARTS   AGE
cluster-autoscaler-aws-cluster-autoscaler-7ccffb6c4-l7w4c 1/1 Running 0 9s3. 부하 테스트
HPA와 Cluster Autoscaler의 기능을 테스트해보기 위해 부하 테스트를 진행합시다. 부하 테스트는 Locust를 이용해 진행합니다. Locust는 Python 코드를 통해 서버 성능 테스트를 진행할 수 있습니다.
사용하는 컴퓨터에서 폴더 하나를 생성하고, python 파일 하나를 작성합니다. '/' 경로로 GET 요청을 계속 보낸다는 내용입니다.
# locustfile.py
from locust import task, FastHttpUser

class MyUser(FastHttpUser):
    @task
    def index(self):
self.client.get('/')pip로 locust를 설치하고, locust 명령어를 사용한 후 http://localhost:8089에 접속하면 웹 인터페이스가 나옵니다.
pip install locust
locustNumber of users는 최대 동시접속자 수입니다. 1000으로 설정하겠습니다.
Spawn rate는 1초당 추가되는 사용자의 수입니다. 10으로 설정하겠습니다.
Host는 부하 테스트를 진행할 서버 주소입니다. ALB의 주소로 설정하겠습니다.

Start swarming을 누르기 전, SSH 창에서 Pod, Node, HPA 상태를 watch로 체크하겠습니다.
watch kubectl get hpa,pods,nodesStart swarming을 누르면 접속자가 올라가는 동시에 CPU 사용량이 올라가게 됩니다.
평균 CPU 사용량이 50%를 넘어가면서 Pod 개수도 늘어나고 있습니다.
NAME                                       REFERENCE         TARGETS    MINPODS   MAXPODS   REPLICAS   AGE
horizontalpodautoscaler.autoscaling/demo   Deployment/demo   244%/50%   2         20        3          3m56s

NAME                        READY   STATUS    RESTARTS   AGE
pod/demo-6f665ffbcb-8ltg9   1/1     Running   0          8m42s
pod/demo-6f665ffbcb-hwszm   1/1     Running   0          10s
pod/demo-6f665ffbcb-mc7xc   1/1     Running   0          10s
pod/demo-6f665ffbcb-mghhz   1/1     Running   0          3m41s
pod/demo-6f665ffbcb-pz4wn   1/1     Running   0          10s
pod/demo-6f665ffbcb-tnbdk   1/1     Running   0          25s

NAME                                                   STATUS   ROLES    AGE     VERSION
node/ip-10-0-131-67.ap-northeast-2.compute.internal    Ready    <none>   3h27m   v1.27.3-eks-6f07bbc
node/ip-10-0-133-56.ap-northeast-2.compute.internal    Ready    <none>   3h26m   v1.27.3-eks-6f07bbc
node/ip-10-0-146-102.ap-northeast-2.compute.internal   Ready    <none>   3h26m   v1.27.3-eks-6f07bbc
node/ip-10-0-155-251.ap-northeast-2.compute.internal Ready <none> 3h27m v1.27.3-eks-6f07bbc많은 Pod 배치로 Node 리소스가 부족하게되자 App Node 하나가 늘어난 것을 볼 수 있습니다.
NAME                                       REFERENCE         TARGETS   MINPODS   MAXPODS   REPLICAS   AGE
horizontalpodautoscaler.autoscaling/demo   Deployment/demo   95%/50%   2         20        20         5m27s

NAME                        READY   STATUS    RESTARTS   AGE
pod/demo-6f665ffbcb-4lrw5   1/1     Running   0          71s
pod/demo-6f665ffbcb-4v7n7   1/1     Running   0          71s
... 16개
pod/demo-6f665ffbcb-tnbdk   1/1     Running   0          116s
pod/demo-6f665ffbcb-wj4xj   1/1     Running   0          86s

NAME                                                   STATUS   ROLES    AGE     VERSION
node/ip-10-0-131-67.ap-northeast-2.compute.internal    Ready    <none>   3h28m   v1.27.3-eks-6f07bbc
node/ip-10-0-133-56.ap-northeast-2.compute.internal    Ready    <none>   3h27m   v1.27.3-eks-6f07bbc
node/ip-10-0-145-159.ap-northeast-2.compute.internal   Ready    <none>   36s     v1.27.3-eks-6f07bbc
node/ip-10-0-146-102.ap-northeast-2.compute.internal   Ready    <none>   3h28m   v1.27.3-eks-6f07bbc
node/ip-10-0-155-251.ap-northeast-2.compute.internal Ready <none> 3h28m v1.27.3-eks-6f07bbc부하 테스트를 종료하고 약 8분 정도를 기다리면 Pod 개수가 줄어들고, 약 12분 정도를 추가로 기다리면 Node 개수가 줄어듭니다.
NAME                                       REFERENCE         TARGETS   MINPODS   MAXPODS   REPLICAS   AGE
horizontalpodautoscaler.autoscaling/demo   Deployment/demo   17%/50%   2         20        2          25m

NAME                        READY   STATUS    RESTARTS   AGE
pod/demo-6f665ffbcb-ffmcp   1/1     Running   0          2m47s
pod/demo-6f665ffbcb-nzsfq   1/1     Running   0          2m8s

NAME                                                   STATUS   ROLES    AGE     VERSION
node/ip-10-0-129-109.ap-northeast-2.compute.internal   Ready    <none>   2m1s    v1.27.3-eks-6f07bbc
node/ip-10-0-131-67.ap-northeast-2.compute.internal    Ready    <none>   3h49m   v1.27.3-eks-6f07bbc
node/ip-10-0-145-159.ap-northeast-2.compute.internal   Ready    <none>   20m     v1.27.3-eks-6f07bbc
node/ip-10-0-155-251.ap-northeast-2.compute.internal Ready <none> 3h49m v1.27.3-eks-6f07bbc오늘의 글은 여기까지입니다. 감사합니다!
참고
https://velog.io/@airoasis/Kubernetes-Autoscaling
Kubernetes 의 Autoscaling
Kubernetes를 사용하는 큰 이유중 하나가 autoscaling 때문이다. 하지만 autoscaling을 제대로 사용하기 위해서는 resource request와 limit 설정 및 Horizontal Pod Autoscaler (HPA), Cluster Auto
velog.io
'AWS' 카테고리의 다른 글
| [AWS] aws-nuke로 모든 리소스 삭제 (1) | 2023.09.24 |
|---|---|
| [AWS] EKS Node Metadata (IMDS) - EC2 (2) | 2023.09.22 |
| [AWS] ArgoCD를 통한 애플리케이션 배포 (with CodeCommit) (1) | 2023.09.19 |
| [AWS] EKS Fargate로 Pod 배포와 로깅 (1) | 2023.09.16 |
| [AWS] CodePipeline을 통한 React CI / CD (2) | 2023.09.15 |